
Integrate NDepend with TeamCity
| Supported versions TeamCity from v10 to latest |
IMPORTANT:
|
NDepend TeamCity Plugin Install
First notice that the TeamCity agent that runs NDepend must be a Windows machine, but the TeamCity server can run on any OS.
Once you've installed NDepend somewhere on the machine that hosts TeamCity, there are two manual steps to install the NDepend Team City plugin.
- Copy/paste the plugin file to the TeamCity plugin folder, and then restart the TeamCity server.
- Let the TeamCity agent on this machine know where NDepend is installed by registering the environment variable named NDEPEND_TEAMCITY_HOME with the NDepend install location, and then restart the TeamCity build agent.
Please watch this 5 minutes videos, or follow instructions below the video:
Step by step install:
Copy/paste the plugin file to the TeamCity plugin folder
- The plugin file is named ndepend-teamcity.zip.
- It can be found in $NDependInstallDir$\Integration\TeamCity.
- Copy this file to the TeamCity plugin directory..
- Typically this directory is C:\ProgramData\JetBrains\TeamCity\plugins.
- To check this is the right plugin directory, you can check the environment variable named TEAMCITY_DATA_PATH value, that should refers to C:\ProgramData\JetBrains\TeamCity.
Restart the TeamCity server
Once the plugin file is copied to the TeamCity plugin directory you need to restart the teamCity server. For that you need to restart the associated Windows service. For example:
- From a PowerShell console you can type Restart-Service TeamCity.
- Or from a command console you can type net stop teamcity and then type net start teamcity.
Check the plugin has been installed properly
Once the TeamCity server is restarted you can check when creating a new Build Step, that the NDepend Build Step is available.

Register the environment variable named NDEPEND_TEAMCITY_HOME
To let the TeamCity agent knows where NDepend is installed on the machine, the environment variable named NDEPEND_TEAMCITY_HOME must be registered with the value $NDependInstallDir$\Integration\TeamCity, where $NDependInstallDir$ is replaced with the NDepend install directory path. For example if NDepend is installed in C:\NDepend the environment variable value must be C:\NDepend\Integration\TeamCity.
It is important to make sure the environment variable is registered in a scope wheren the TeamCity build agent service will have access to. To do so the recommendation is to register a system environment variable.
Restart the TeamCity agent
Once the environment variable named NDEPEND_TEAMCITY_HOME has been registered you need to restart the TeamCity build agent. For that you need to restart the associated Windows service. For example:
- From a PowerShell console you can type Restart-Service TCBuildAgent.
- Or from a command console you can type net stop tcbuildagent and then type net start tcbuildagent.
Check the TeamCity agent takes account of the environment variable
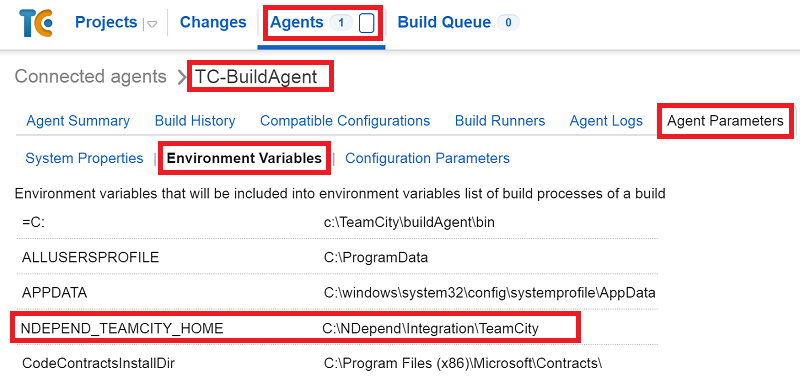
To check that a TeamCity agent, once restarted, takes account of our environment variables, you can check in the TeamCity web interface that the environment variable is registered:
TeamCity interface > Agents menu (at the top) > select the agent > Agent parameters > Environment Variables
NDepend tab downloads report instead of displaying it — how to fix?
This issue can be resolved by configuring the following setting in TeamCity: Administration > Server Administration > Global Settings > Artifacts Domain Isolation > Artifacts URL.

In the screenshot above, TeamCity is installed locally. We used http://127.0.0.1:8111 instead of http://localhost:8111 to avoid the Must differ from Server URL error. If you encounter this error, you may need to use a similar workaround.
What to do in case no NDepend issue is reported?
Some users reported that sometime no NDepend issue is reported with TeamCity version 2020.1 or more.

You can solve this problem this way:
- 1) Download JAXB
- 2) Unzip and copy files in "mod" directory to "<AgentDir>\lib\"
- 3) Restart the Teamcity agent
NDepend TeamCity Plugin Walk Through
Find below a 8 minutes walk through video. This video assumes you already have NDepend TeamCity plugin installed.
- 0:25 Before building an NDepend Build Step make sure you already have Version Control Settings to poll the application to analyze, and then compile it in a build step.
- 0:57 Add a NDepend Build Step and define the NDepend project to analyze (.ndproj file extension).
- 1:54 Run the TeamCity process with the NDepend Build Step and see NDepend build logs.
- 2:21 NDepend rules violations are mapped to TeamCity code inspection report, and NDepend critical rules violations are mapped as errors.
- 2:46 The NDepend report is integrated into TeamCity.
- Some browser might not let you easily open a link that points toward an UNC path. Typically when the NDepend report is shown through a TeamCity URN path, Firefox has problems resolving the NDepend report relative paths to images, to URN paths (Chrome, IE and Edge don't have this problem). You can find various workaround to this situation on the web. You can also still right-click the link and select Copy Link Location and then paste it to the Location Bar.
- 2:57 The NDepend report, the analysis result file (.ndar file extension) and the trend metric store, are stored as TeamCity build artifacts of the build by the plugin.
- 3:53 Demo of the NDepend rules violations mapped to TeamCity code inspection report, with the ability to jump to source code declaration in the Visual Studio code editor, and the abaility to filter new violations since the last build.
- 4:43 The NDepend plugin logs TeamCity statistics about rules and critical rules violations, trend charts of these statistics can be seen.
- 5:17 In the Build Configuration settings, you can set build failure upon rules and critical rules violations values.
- 5:40 NDepend Build Logs can be used to investigate NDepend analysis problems.
- 6:30 The NDepend Build Step comes with advanced options to override some NDepend project settings.
- 6:55 The Trend Metrics store is archived as a build artifact. This store can be consolidated during each build, and Trend Metrics charts can be visible from the integrated NDepend report.
- 7:30 To run an NDepend analysis against a prior build (a baseline for comparison), you can refer a particular prior build.
|
IMPORTANT:
|