.NET Code Quality in Azure DevOps with the NDepend ADO Extension
Send us an email at devops@ndepend.com for product and sales questions.
- Build Task
- Dashboard
- Perspective
- Comparing against a Baseline
- Quality Gates
- Rules
- Technical Debt and Issues
- Trends
- Code Metrics
- Build Summary Recap
- NDepend Task Analysis Logs
-
How To?
- How to activate the trial license?
- How to configure the NDepend Hub?
- How to enable code coverage?
- The NDepend task cannot find my assemblies, what to do?
- How to customize rules (add/remove change)?
- How to customize Quality gates?
- How to customize trends?
- How to customize the technical debt rating?
- How to exclude third-party assemblies from analysis results?
- How to annotate a pull request with the NDepend issues?
- How to access the NDepend result of a specific build?
Overview Tour 3 minutes
FAQ
Do the extension supports both Azure DevOps Services (formerly VSTS) and Azure DevOps Server (formerly TFS)?
Yes the extension supports both versions : Azure DevOps Services for the cloud version and Azure DevOps Server for the on-premises version.
Do I have to purchase a license for all the Azure DevOps/TFS users?
No, you have to purchase only the users that will access the NDepend dashboard.
Do the Azure DevOps/TFS extension send any data to an external server?
The NDepend extension does not use an endpoint to do the analysis. The NDepend tool is embedded in the extension and all the results are stored as a build artifacts in your server. No data goes outside of your server.
Why some of my projects are not analyzed?
To analyse an assembly , NDepend needs also its ODB file. And if for some assemblies the PDB file is not generated the assembly will not be parsed. More information in the Understand the NDepend Analysis Inputs documentation.
How to exclude some projects from the analysis?
To exclude some of your projects, you have to specify an NDepend project file (.ndproj extension) to your task.
In such NDepend project you can specify the assemblies to analyze, and enable the Analyze only the assemblies from the NDepend Task flag (see the screenshot in the Build Task section of this documentation).
A Developer or Build-Machine license is required to create and edit an NDepend project.
Why sometimes the NDepend overall code coverage ratio is not the one expected?
The coverage ratio reported by the NDepend Azure DevOps/TFS extension can differ from the one you get from Visual Studio. This is because the NDepend coverage doesn't consider C# open and close braces characters { } as line of code that can be tested.
If the discrepency is too high to be explained this way, maybe you need to take account of a .runsettings file during NDepend analysis. How to specify a .runsettings file is explained here.
Why sometimes the NDepend results are different in the Azure DevOps/TFS extension?
To have the same results you have to use the same .ndproj project file, define the same baseline and import the same coverage data.
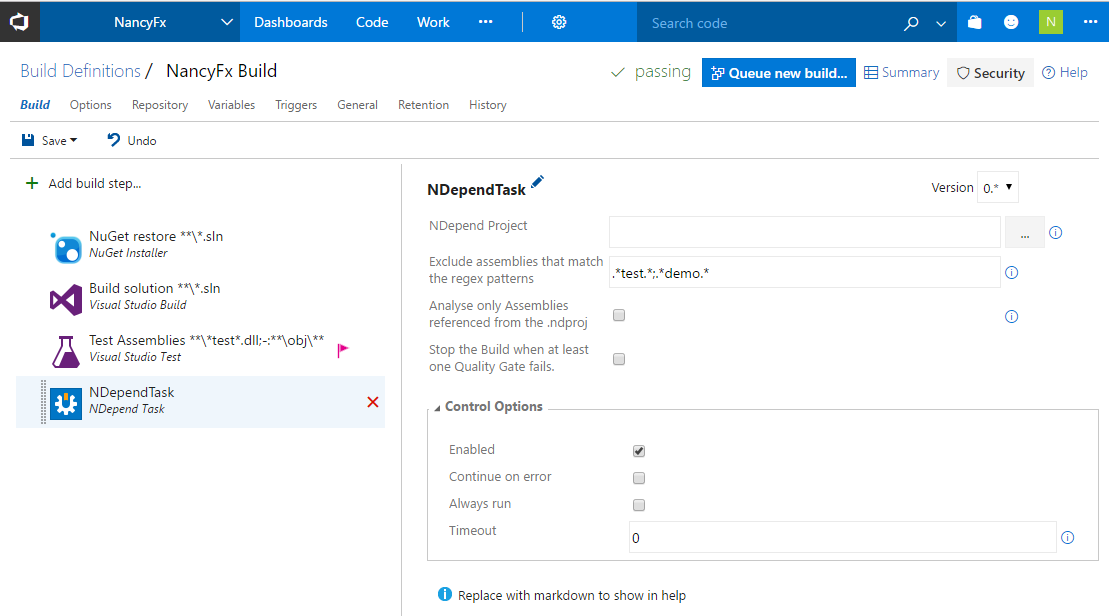
Build Task
The NDepend Azure DevOps extension consists of a build task that analyses code and code coverage data yielded by the build process. The NDepend Azure DevOps/TFS hub presents the results which embed the NDepend dashboard and makes data actionable by drilling down into any item through a single click.
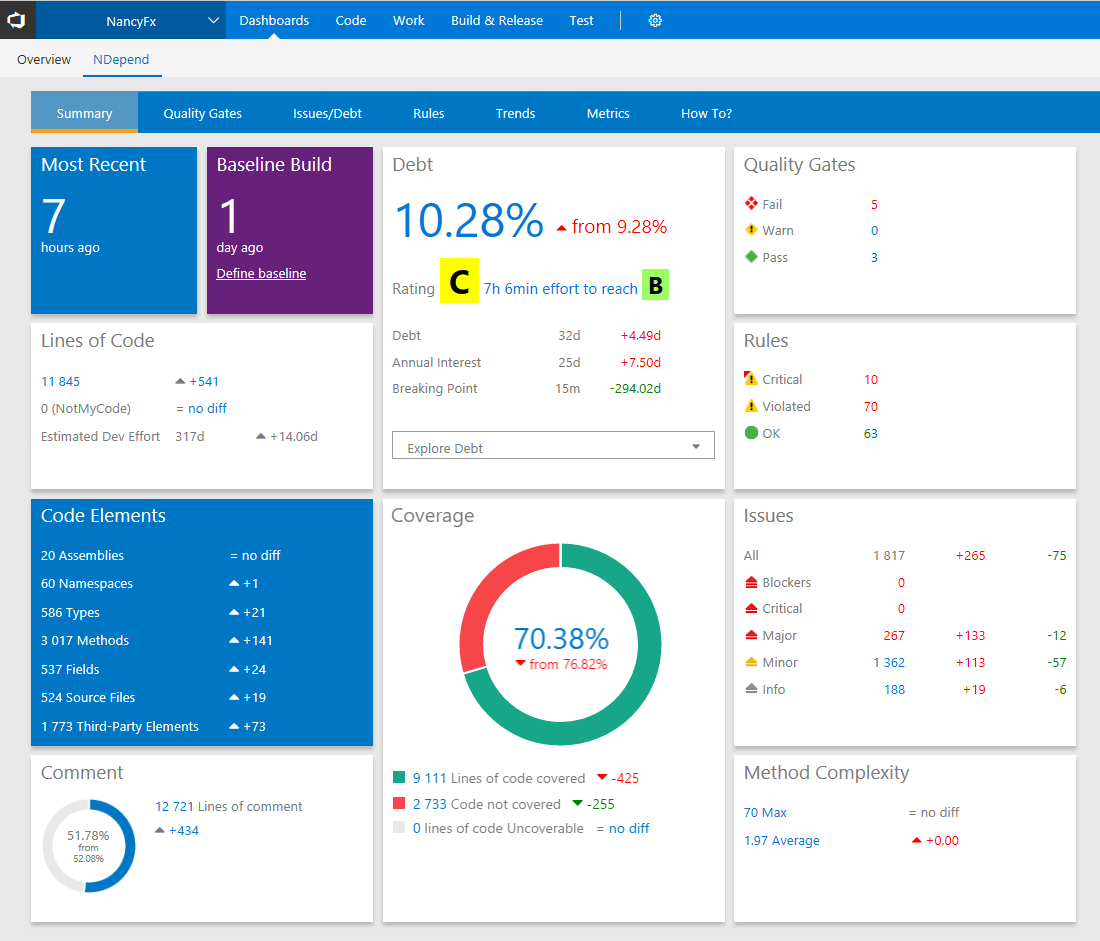
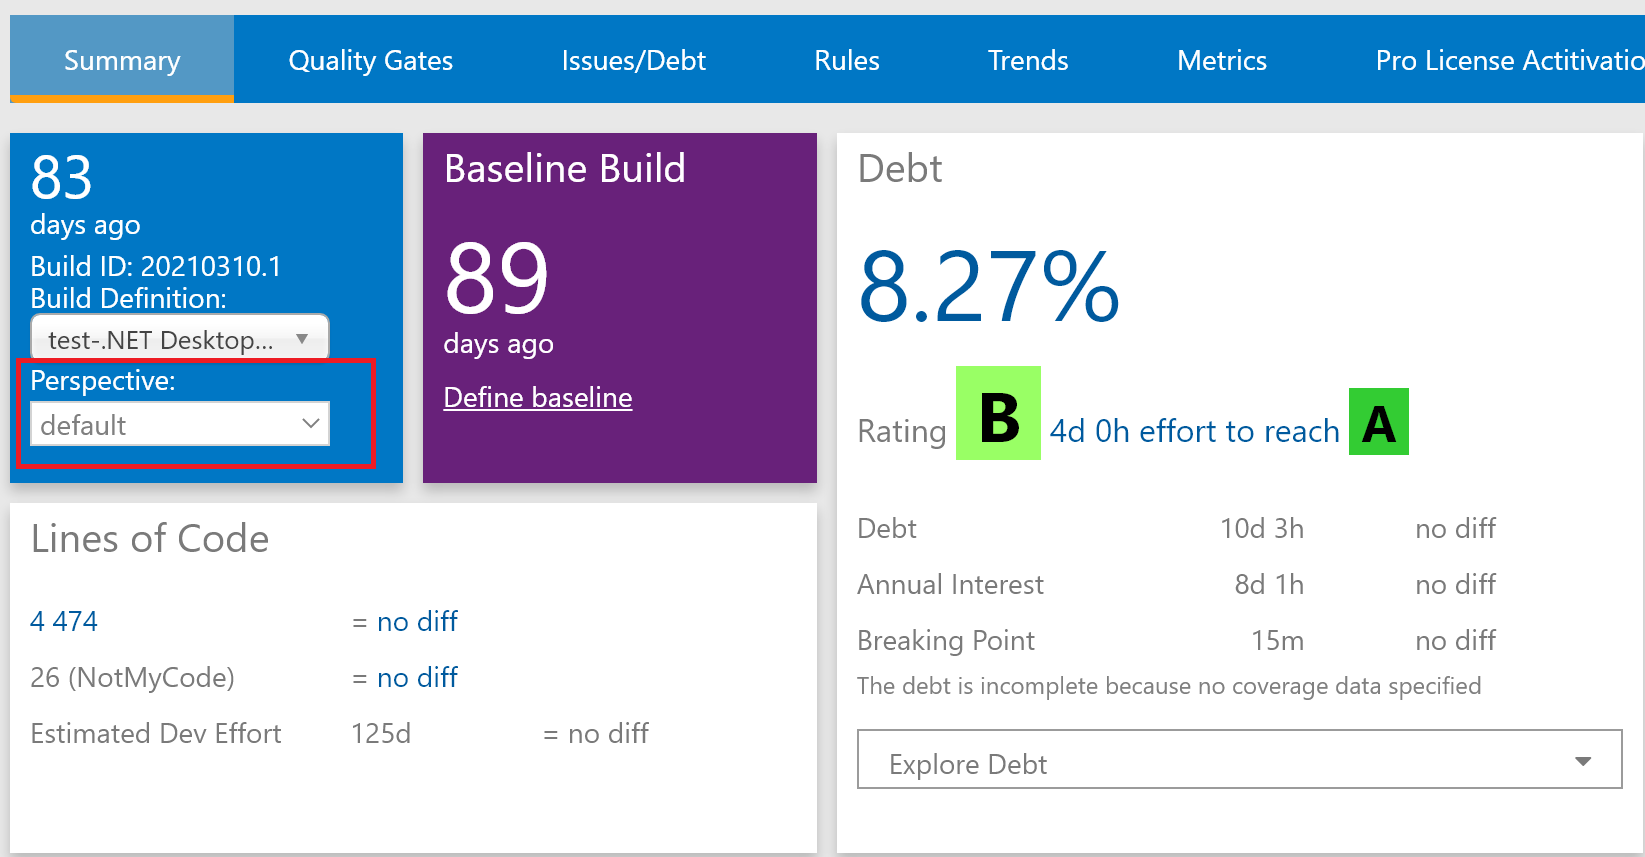
Dashboard
The hub's Dashboard shows a recap of the most relevant data including technical debt estimations, code size, Quality Gates status, rules and issues numbers. A TFS build can be used as a baseline. All dashboard data is then diff-ed since the baseline. Each Dashboard item is clickable to view more.
Perspective
The NDepend Azure DevOps extension provides the perspective feature to let you have many analysis results for the same project, each analysis could use a different configuration for rules, quality gates, trends ... For that, you can have multiple NDepend tasks in your build definition, each one has its custom perspective name:
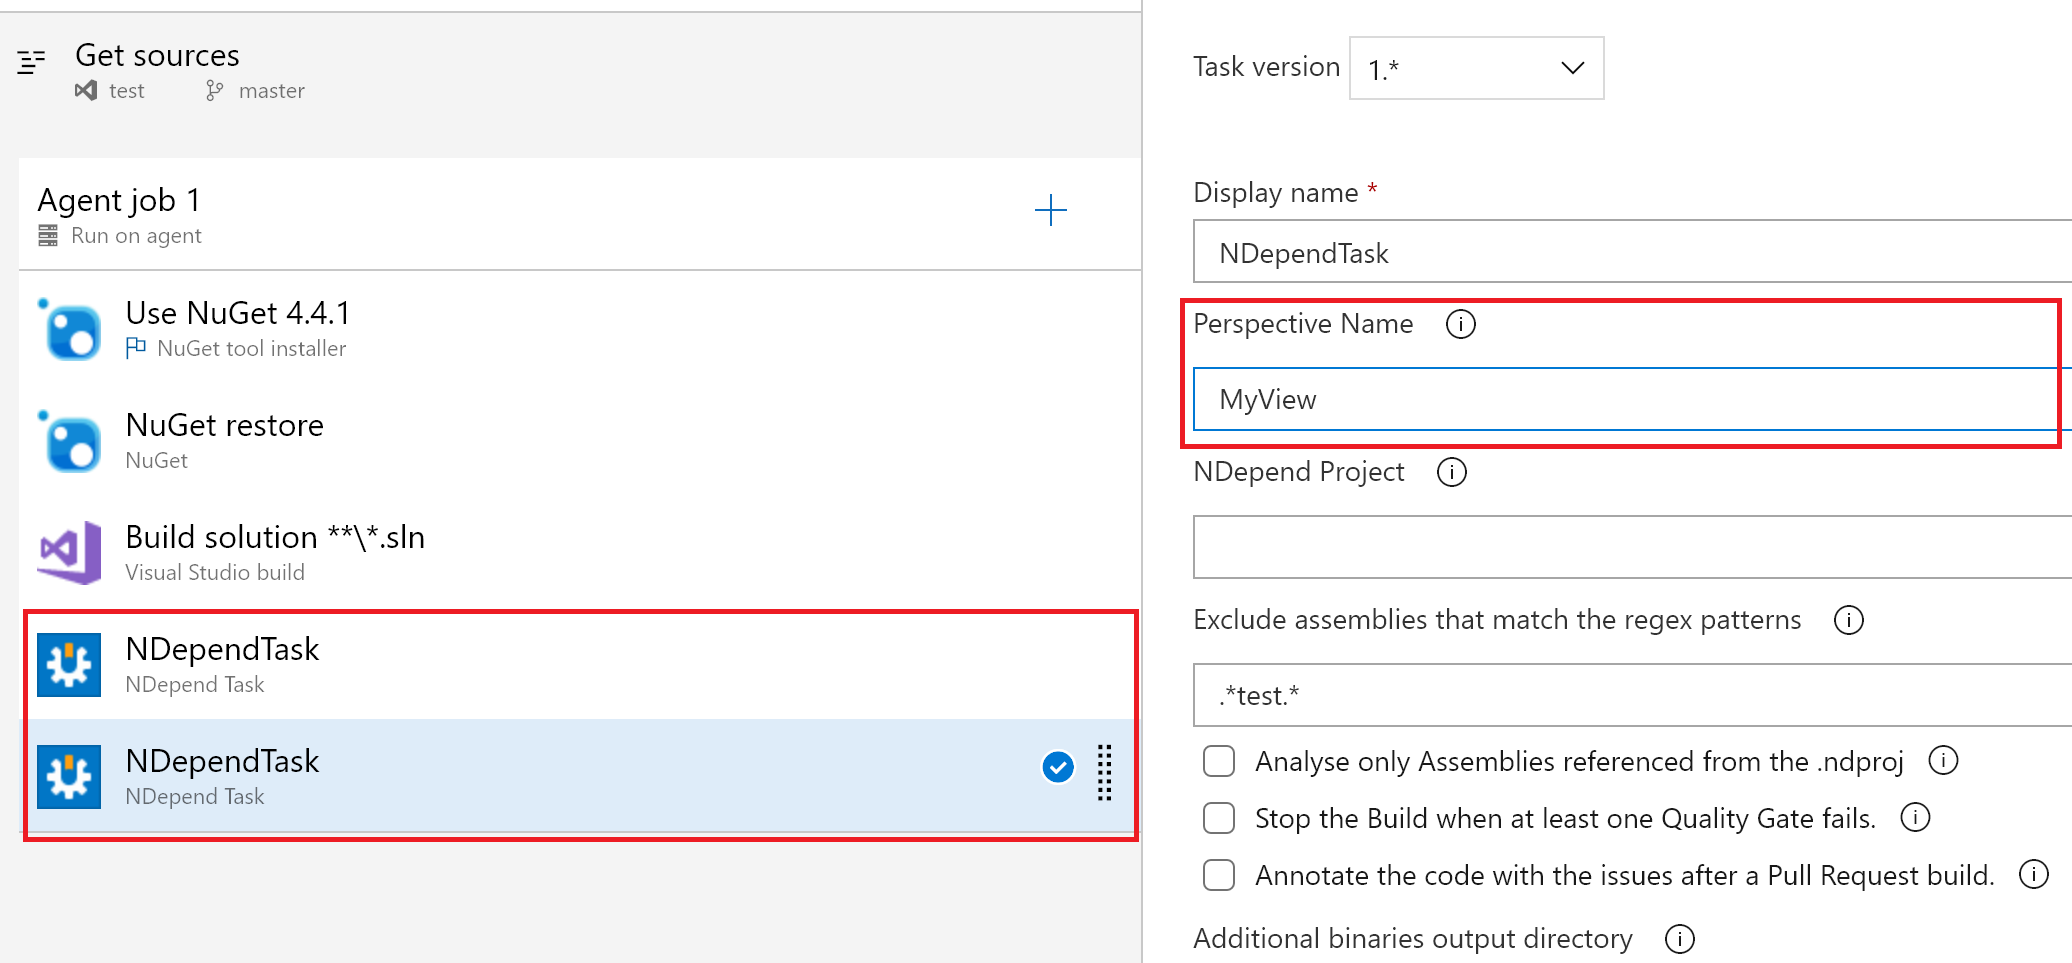
Here is how to switch between various perspectives from the dashboard:
Comparing against a Baseline
A diff can be made against a baseline. The baseline can be specified through the Define baseline link from the NDepend Dashboard:

The dialog shown below appears and lets choose different options to define the baseline. The option choosen for baseline is then persisted within the NDepend extension storage.
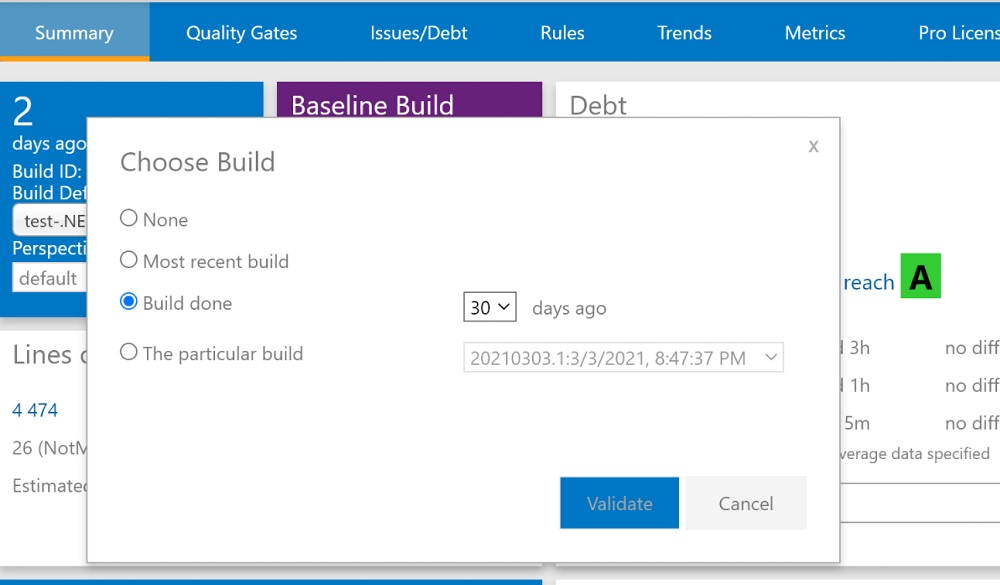
Notice that the baseline is not applied immediately after the change. A new build must be launched to use this new baseline configuration.
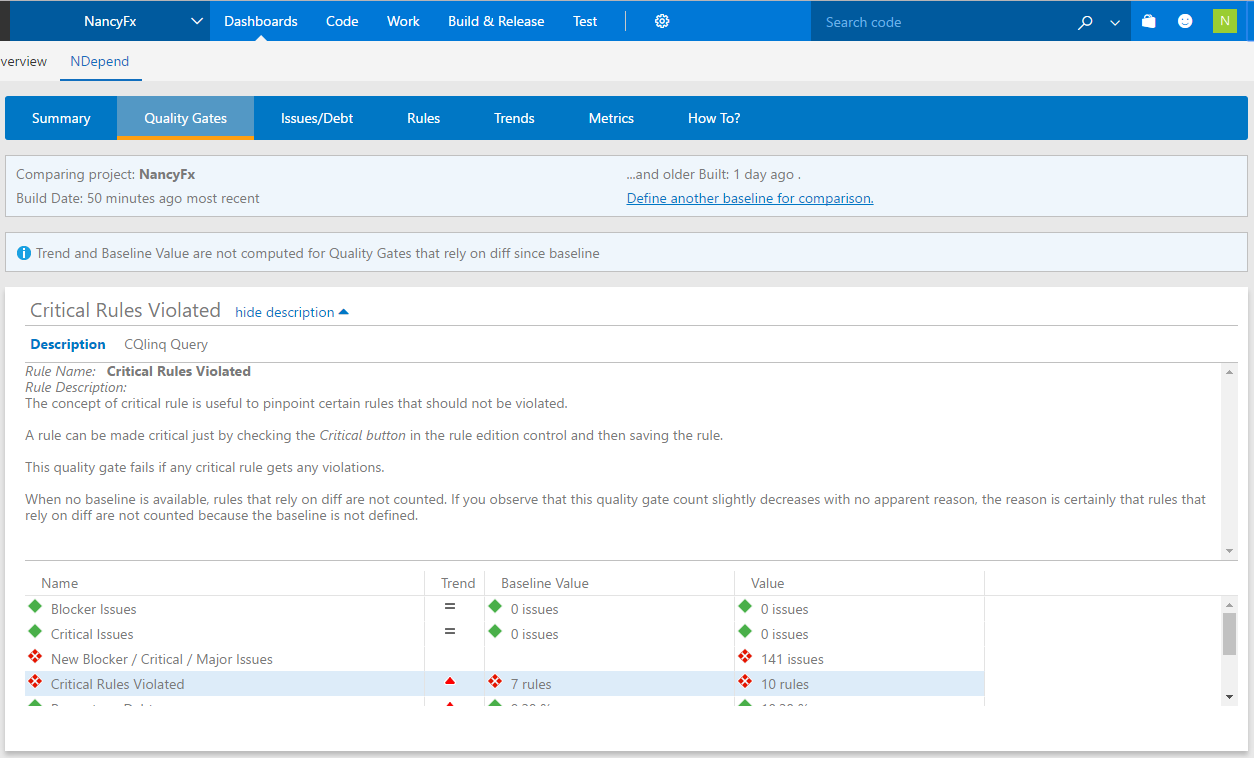
Quality Gates
A Quality Gate is a check on a code quality fact that must be enforced before releasing and eventually, before committing to source control. A Quality Gate can be seen as a PASS/FAIL criterion for software quality.
A dozen of default Quality Gates are proposed by NDepend related to measures like technical debt amount, code coverage or amount of issues with particular severity. For example a Quality gate can be written to enforce a certain amount of code coverage by tests ratio on *code added and refactored since the baseline*. A detailed summary of Quality Gates status is available.
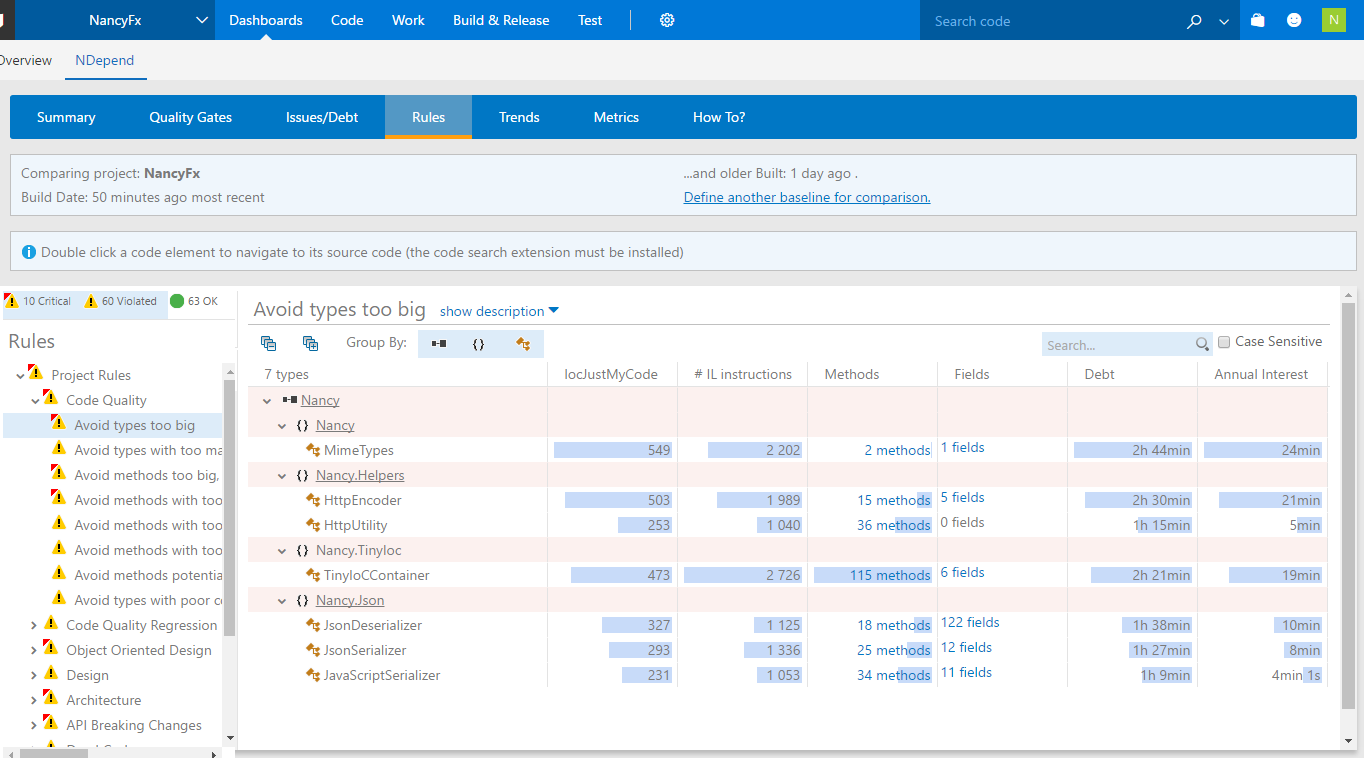
Rules
More than 150 default code rules are proposed to check against best practices. Support for Code Query over LINQ (CQLinq) to easily write custom rules and query code. CQLinq is used both to write the rule code, and also to write smart C# formulas that estimate the **Technical-Debt for each issue** (i.e the cost-to-fix an issue).
Rules details can be explored. Clicking a rule violation redirects the user to the Azure DevOps Code Search extension, displaying the source code of the culprit code element.
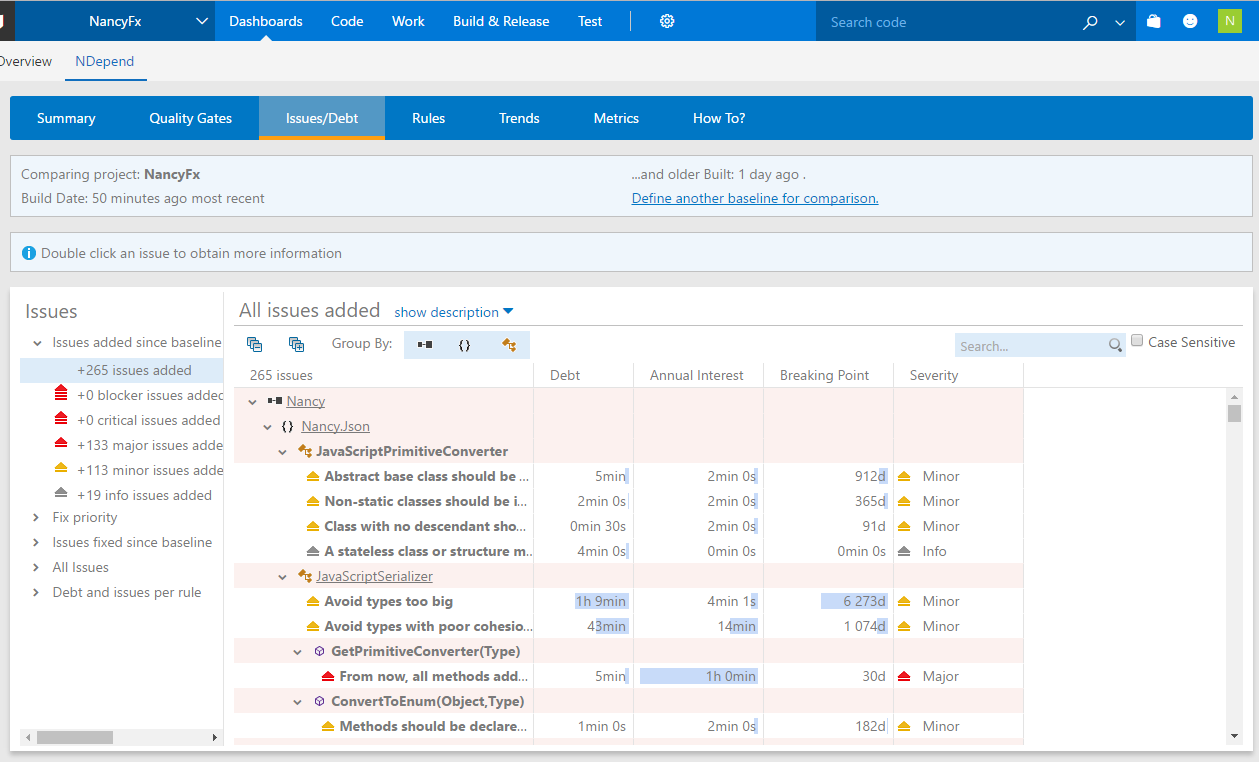
Technical Debt and Issues
Technical debt can be drilled down till the issue level. Clicking an issue results in editing it in the Rules panel. The datagrid is interactive: issues can be grouped, ordered and filtered by rule names, by code elements, by severity or by their status since the baseline (new / exist / fixed).
Issues can be also sorted by estimated Technical-Debt metrics, including issues fix prioritization. Typically severe issues that cost little to be fixed should be fixed first and are prioritized.
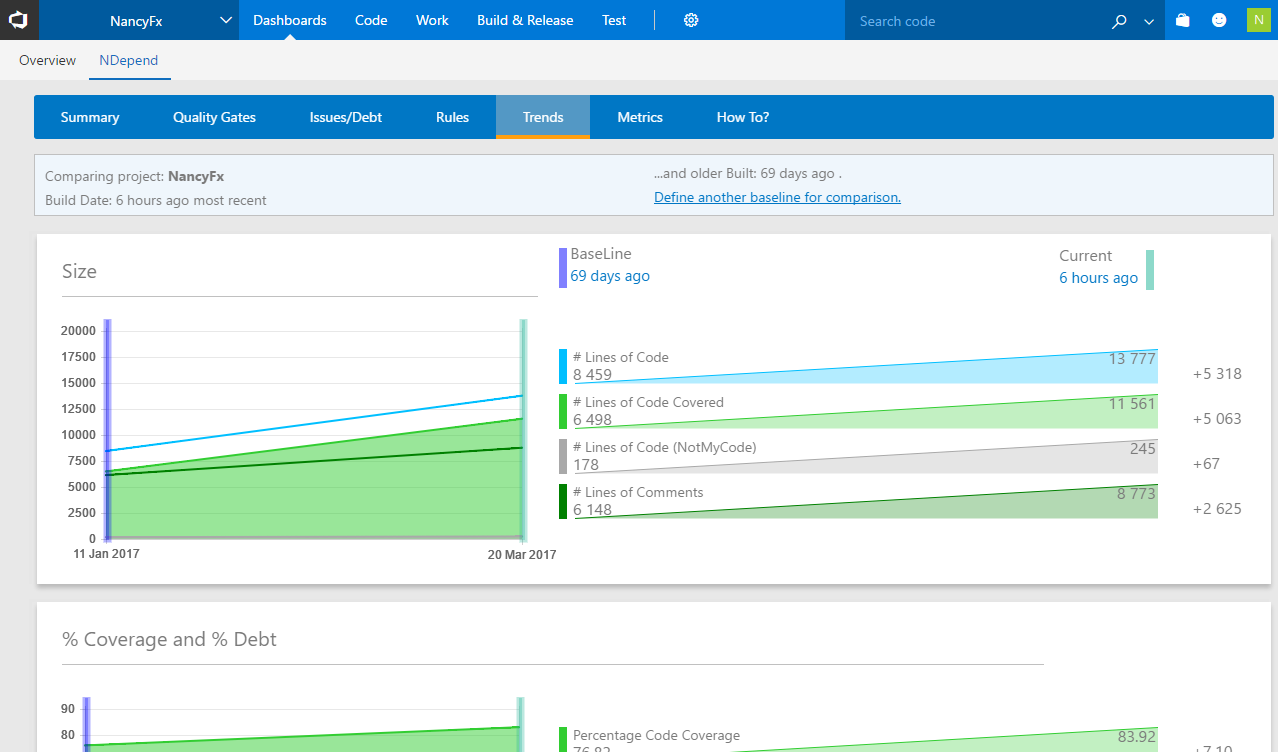
Trends
The Azure DevOps extension logs Trend Metrics for each build, and Trend charts are shown. More than 70 predefined Trend Metrics are proposed and CQLinq lets write custom ones.
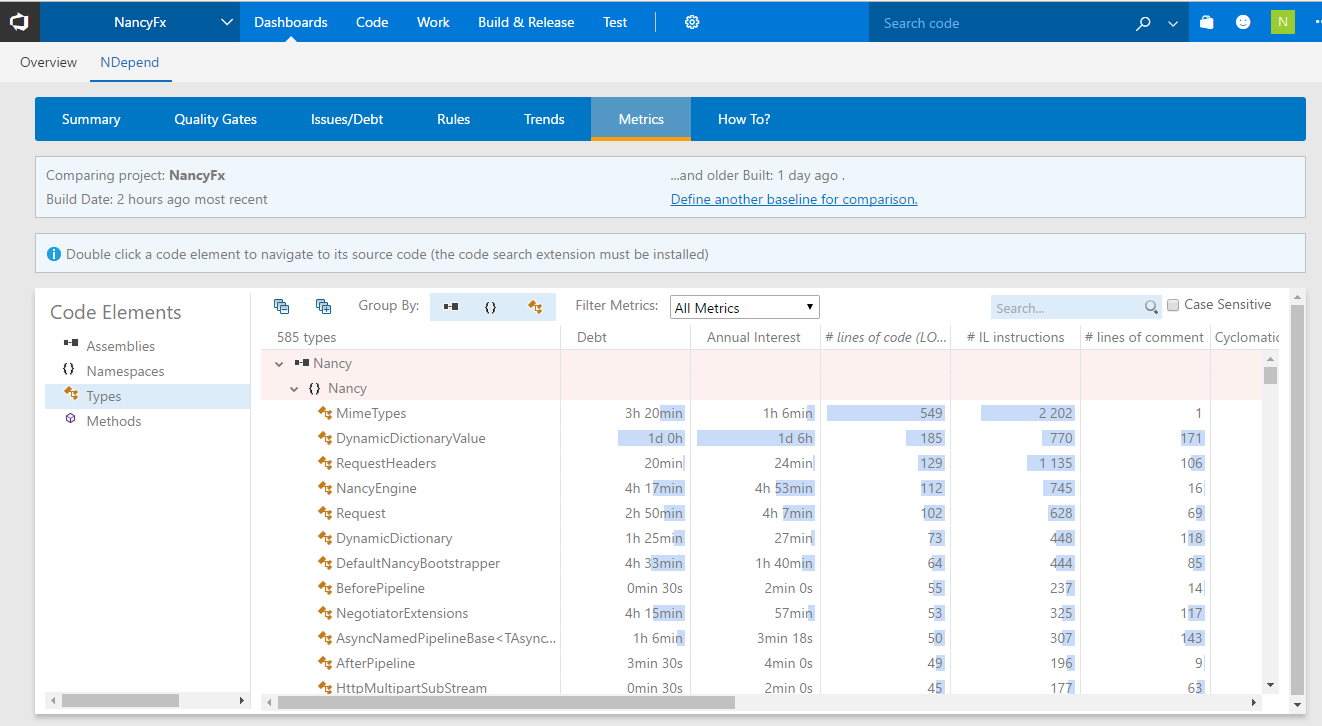
Code Metrics
A panel shows a code metrics recap for each assembly, namespace, class or method. Code metrics include Lines of Code ; Cylomatic Complexity ; Technical Debt (estimated cost to fix code elements issues) ; Code Coverage ratio ; Comment ratio ; # user / # used... The datagrid is interactive: elements can be grouped, ordered and filtered by name and they can also be sorted by metric value.
Build Summary Recap
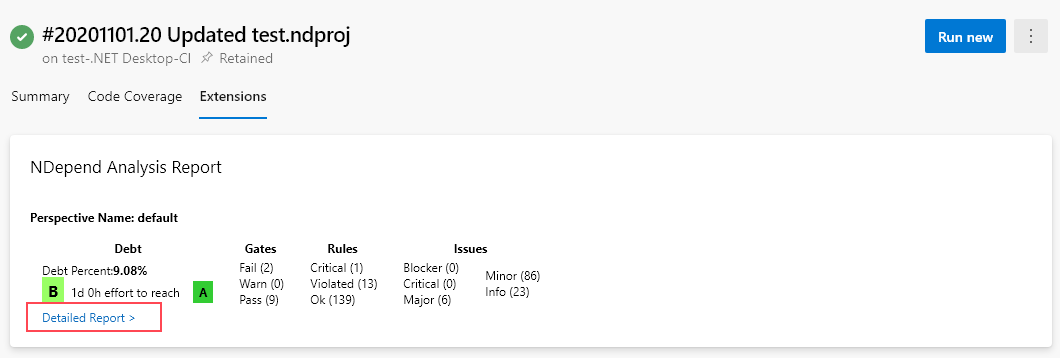
An NDepend Analysis recap is shown in each Build Summary:

NDepend Task Analysis Logs
The NDepend task logs contains information about the health of the build process as explained here (assembly versioning problems, outdated files...). You will also find information and warnings about the analysis that can be helpful to investigate some unexpected results, like a Visual Studio solution file not resolved at analysis time for example.
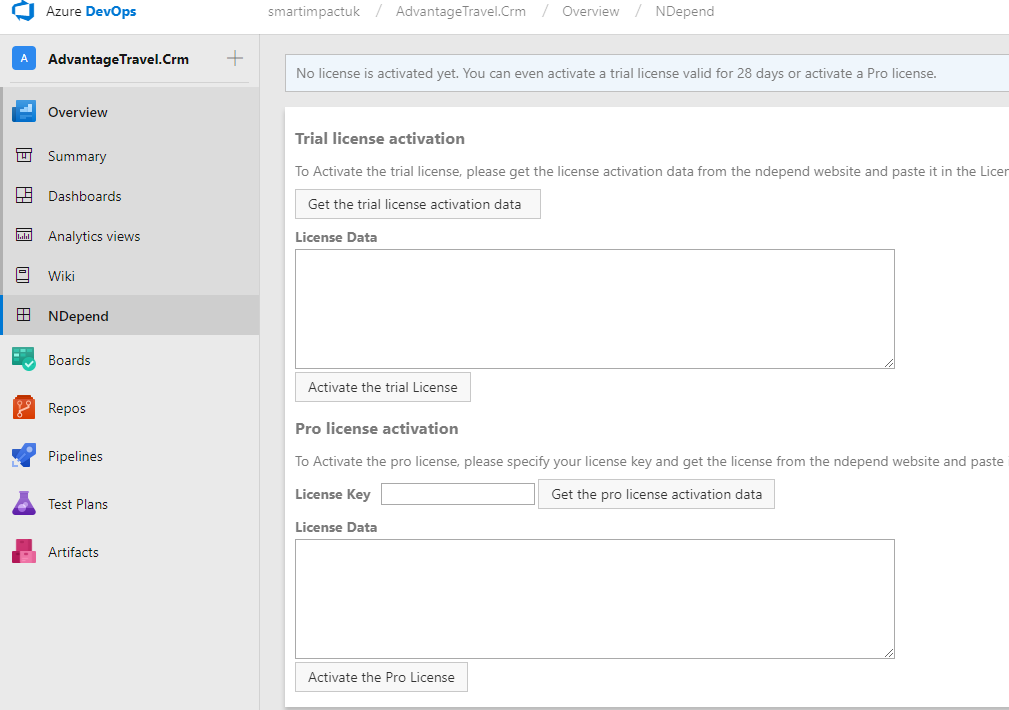
How to activate the trial license?
Before adding the NDepend task into your build definition, you have to activate first the NDepend license from the NDepend dashboard.
How to configure the NDepend Hub?
This extension only runs on a Windows build agent. This situation might evolve in the future.
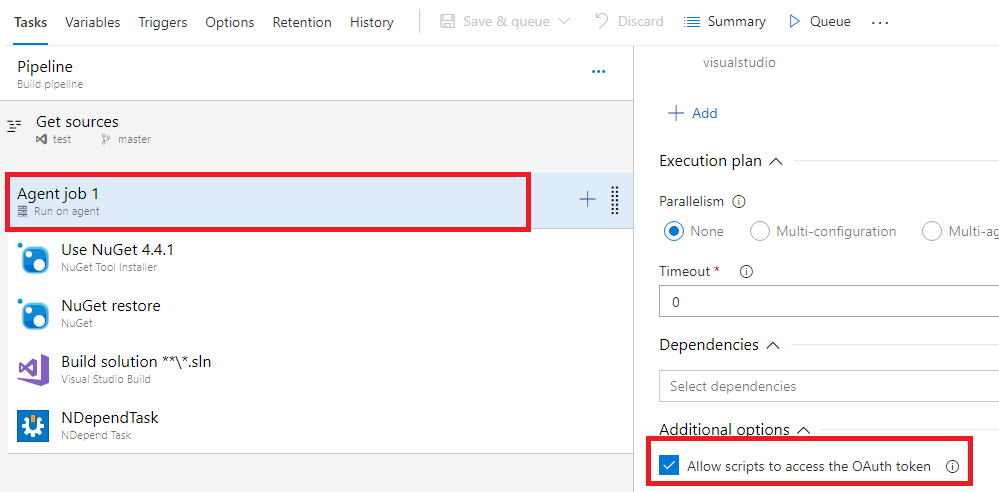
1) Enable Scripts to access OAuth token
The NDepend task gets the baseline data stored in your build artifact to achieve the comparison between two builds. For that you need to enable scripts to access the OAuth token, that will permit to access to the build artifacts using the Azure DevOps Rest API. This option can be either enabled from the yml script...
- task: ndepend.ndependextension.ndepend-task.NDependTask@1
    displayName: 'NDependTask '
    env:
      SYSTEM_ACCESSTOKEN: $(system.accesstoken)
...or from the build definition designer:
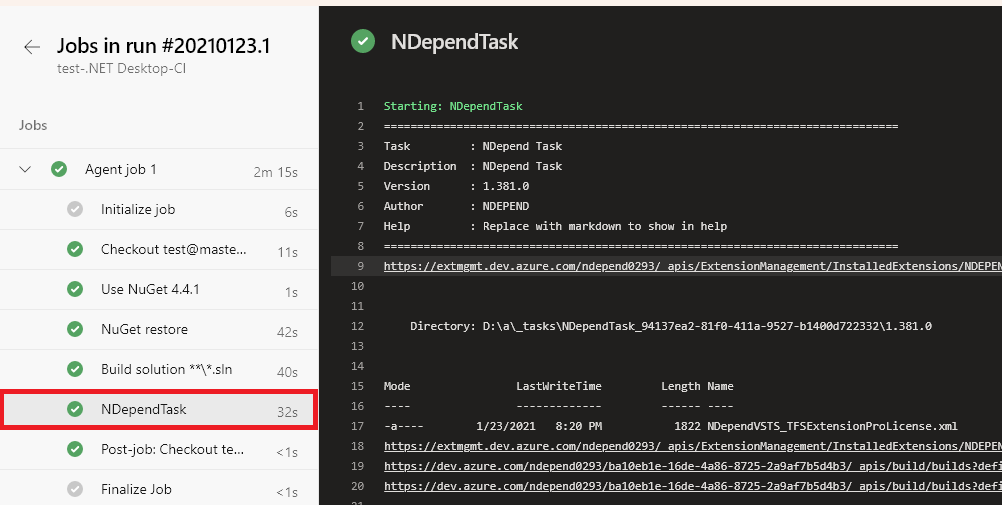
2) Add the NDepend task to your build workflow
The NDepend task can be either added from the yml script...
- task: ndepend.ndependextension.ndepend-task.NDependTask@1
    displayName: 'NDependTask '
    env:
      SYSTEM_ACCESSTOKEN: $(system.accesstoken)
...or from the build definition designer:
If a unit test task is executed, please ensure that the NDepend task is executed after it.
In case of yml script, here's the task command with the parameters:
- task: ndepend.ndependextension.ndepend-task.NDependTask@1
  displayName: 'NDependTask '
  env:
      SYSTEM_ACCESSTOKEN: $(system.accesstoken)
  inputs:
    viewname: test
    ndproj: myproject.ndproj
    excluded: '.*test.*'
    Assemblies: false
    BuildGates: false
    PullRequest2: false
    iscoverage: false
    coverage: src
All the parameters are optional, and here are their definitions:
- viewname: It allows you to have multiple configurations for the same project, each project has its own ndproj file.
- excluded: It's a regex expression to filter the assemblies.
- Assemblies: If it's set to true, NDepend will analyze only the assemblies referenced from the ndproj file.
- BuildGates: If it's set to true the build will fail if a quality gate failed.
- PullRequest2: Set it to true if you want to associate the NDepend issues to a pull request.
- iscoverage: Set it to true if you have some extra directories where the coverage files exist.
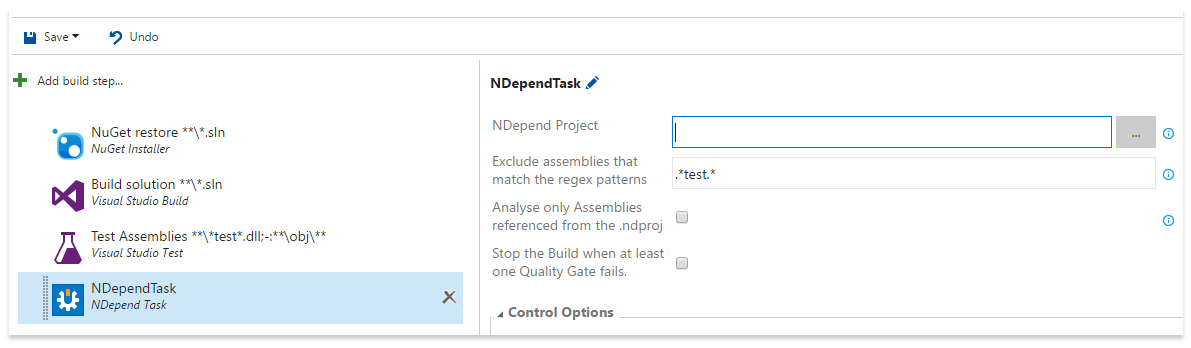
3) Configure the NDepend Task
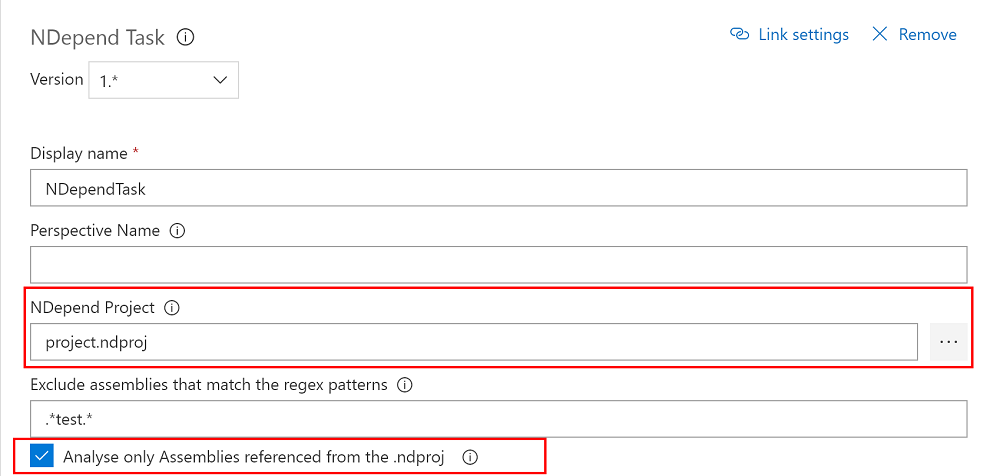
- NDepend Project: Specify the NDepend project that contains your rules.The ndproj file is published as an artifact against the source directory. If it's not specified the default ones will be used.
- Exclude assemblies that match the regex patterns: This option is useful to exclude some dlls from the analysis, like the unit test ones.The regex patterns are separated by ';'.
- Analyse only Assemblies referenced from the .ndproj: This option is useful to focus only on a subset of all assemblies built by the build Azure DevOps/TFS build agent.
- Stop the Build when at least one Quality Gate fails.
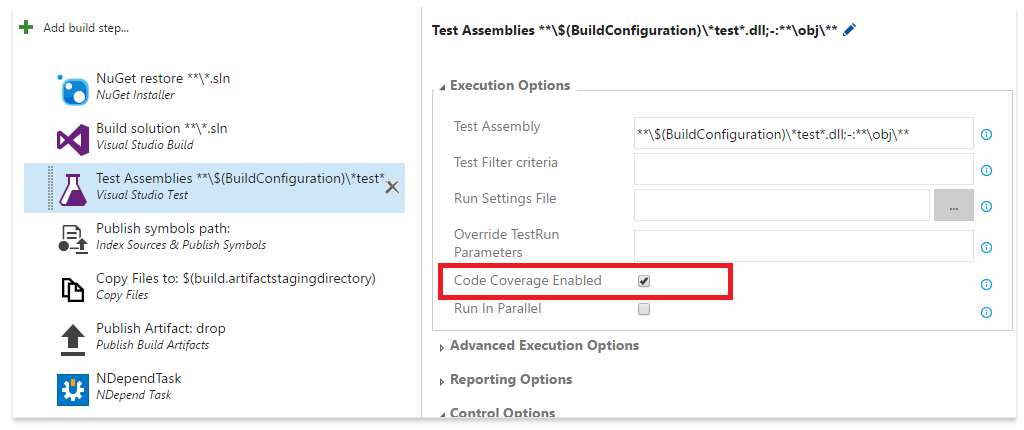
How to enable code coverage?
To get the coverage data from the Azure DevOps test task you need to activate the code coverage:
However if you are running a specific or custom task to gather code coverage with a technology different than Microsoft Visual Studio coverage you can still use the Get Coverage Files from a specified directory NDepend task option. In most cases NDepend should be smart enough to determine for each coverage file (there can be one or many), which coverage technology has been used to generate it and how to import this data. Visual Studio Coverage, NCrunch, dotCover, OpenCover, Coverlet (with OpenCover output format) and NCover coverage technologies are supported.
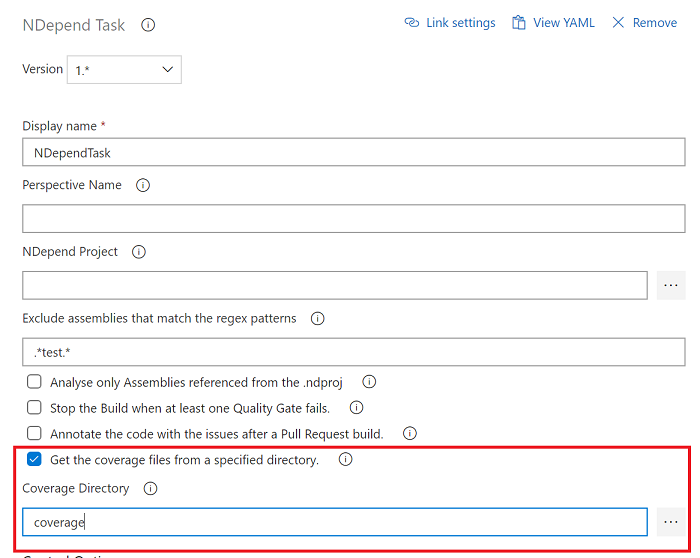
Filter to locate coverage files under the specified directory
If NDepend doesn't locate your coverage file(s) under the specified directory, a wildcard-based filter has to be provided to precisely locate the coverage file(s) under the directory specified. The filter can only be provided through an NDepend project file (.ndproj file) referenced by the NDepend task. This section explains how to specify an NDepend project to the NDepend task.
The NDepend project can be edited through VisualNDepend.exe to specify the filter, as explained in the Coverage import section here. The wildcard-based filter string can be defined this way:
- Empty string means that only files in coverage directory are taken account.
- Filter "*" matches all coverage files in coverage directory (same as above).
- Filter "**\*.xml" matches all files with .xml extension (case-insensitive) in coverage directory and in all its child directories (recursive).
- Filter "Cov*\*" matches all files in coverage directory's child directories whose name starts with Cov (case-insensitive).
If you don't have a Developer or BuildMachine license to run VisualNDepend.exe the XML NDepend project file has to be edited manually. Just specify the wildcard-based filter string through the CoverageDirFilter attribute of the CoverageFiles XML element.
<CoverageFiles CoverageDir="..." CoverageDirFilter="Cov*\*" UncoverableAttribute="..." CoverageExclusionFile="..." />
Coverage exclusion through a .runsettings file
If you are using a .runsettings file to exclude some code elements from coverage, such file can be specified to NDepend so it will read and process it at analysis time to achieve proper exclusions.
The .runsettings file path can only be provided through an NDepend project file (.ndproj file) referenced by the NDepend task. This section explains how to specify an NDepend project to the NDepend task.
The NDepend project can be edited through VisualNDepend.exe to specify the path to the .runsettings file, as explained in the Coverage exclusion section here.
If you don't have a Developer or BuildMachine license to run VisualNDepend.exe the XML NDepend project file has to be edited manually. Just specify the .runsettings file path through the CoverageExclusionFile attribute of the CoverageFiles XML element. The .runsettings file path can be either an absolute path, or a path relative to the NDepend project file location.
<CoverageFiles CoverageDir="..." CoverageDirFilter="..." UncoverableAttribute="..." CoverageExclusionFile=".\Dir\File.runsettings" />
The NDepend task cannot find my assemblies, what to do?
In that case you need first to specify an NDepend project file (.ndproj extension) to your task. To do so:
- 1) First create your NDepend project with VisualNDepend.exe or with NDepend.Console.exe (as explained here), and make sure it references your Visual Studio solution file (.sln).
- 2) Then from the NDepend task configuration panel, specify this uploaded project, and check the flag "Analyse only Assemblies referenced from the .ndproj".
Once the NDepend project file is specified to the task, open the .ndproj project file with a text editor and make sure that:
- 1) the section <RootDirResolvingInfo Enabled="True"> is set to true
- 2) the <RootDir> value and the <Hint> value gets updated to locate your assemblies. These values are explained here.
...
<IDEFiles>
   <IDEFile FilePath="..\..\source\repos\ClassLibrary30\ClassLibrary30.sln" Filters="-test" Configuration="DEBUG|AnyCPU">
      <RootDirResolvingInfo Enabled="True" Hints="Release|Debug|bin|.bin|AnyCPU|x64|x86|v*.*|net*" TimeOut="10">
        <RootDir>.</RootDir>
      </RootDirResolvingInfo>
    </IDEFile>
</IDEFiles>
...
If you have a Developer or BuildMachine license, the NDepend project file can be updated without XML edition from:
- Start VisualNDepend.exe
- Open the NDepend project
- Project Properties panel
- Code to analyze tab
- Right click your Visual Studio solution row
- Click Edit menu
- Resolve the assemblies of this VisualStudio solution under a Root folder (recursive)
- Edit the 3x values Root Folder, Folder Bame Hints, Resolving Timeout.

How to customize rules (add/remove change)?
Custom Rules can only be provided through an NDepend project file (.ndproj file) referenced by the NDepend task. This section explains how to specify an NDepend project to the NDepend task.
Once the project is added to the task, please refer to https://www.ndepend.com/docs/cqlinq-syntax#Rule
How to customize Quality Gates?
Custom Quality Gates can only be provided through an NDepend project file (.ndproj file) referenced by the NDepend task. This section explains how to specify an NDepend project to the NDepend task.
Once the project is added to the task, please refer to https://www.ndepend.com/docs/quality-gates
How to customize trends?
Custom Trends can only be provided through an NDepend project file (.ndproj file) referenced by the NDepend task. This section explains how to specify an NDepend project to the NDepend task.
Once the project is added to the task, please refer to https://www.ndepend.com/docs/trend-monitoring
How to customize the technical debt rating?
Custom technical debt rating can only be provided through an NDepend project file (.ndproj file) referenced by the NDepend task. This section explains how to specify an NDepend project to the NDepend task.
Once the project is added to the task, please refer to https://www.ndepend.com/docs/technical-debt
How to exclude third-party assemblies from analysis results?
The NDepend extension detects by default all the assemblies of your application. However, sometime one or several assemblies referenced by your application (like Log4Net.dll for example, what is called a third-party assembly) can be also considered as part of your application. In such case here are the steps to follow to exclude the third party assemblies:
- Open VisualNDepend.
- Create a new NDepend project.
- Add your assemblies from the Project Properties => Code To Analyze tab.
- Save the .ndproj file.
- Upload the .ndproj file into your Devops source repository.
- From the NDepend task configuration, reference the .ndproj file in the “NDepend Project” input. And check also the “Analyse only the assemblies referenced from the .ndproj”.
- Start a new build.
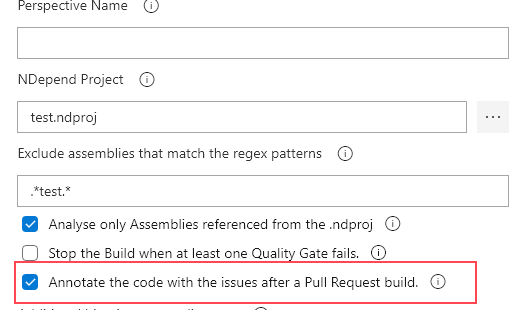
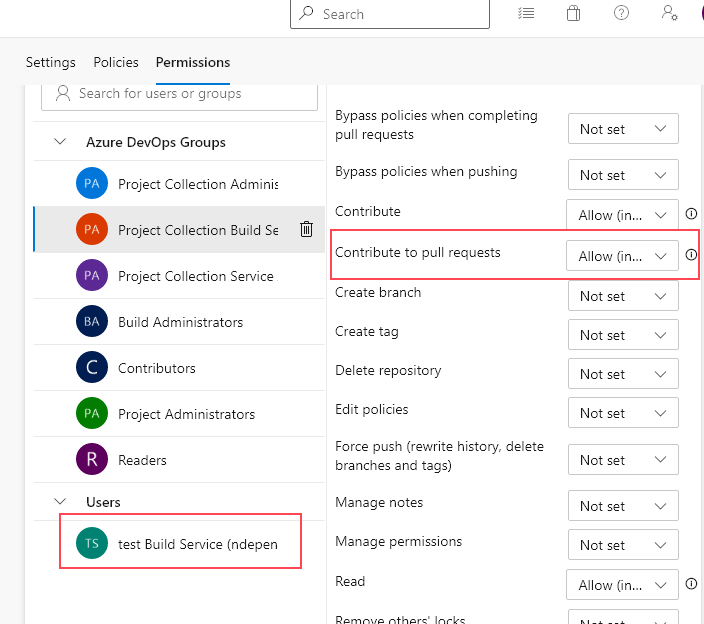
How to annotate a pull request with the NDepend issues?
- Activate the Annotate the code with the issues after a Pull Request build flag of the NDepend task:
- From the repository permissions page, grant the "Contribute to pull requests" permission to the build service user.

How to access the NDepend result of a specific build?
By default, the NDepend dashboard shows the latest NDepend result. However, if you need the NDepend result of a specific build you have to go to its summary, and from the extensions tab, click on the Detailed report link.